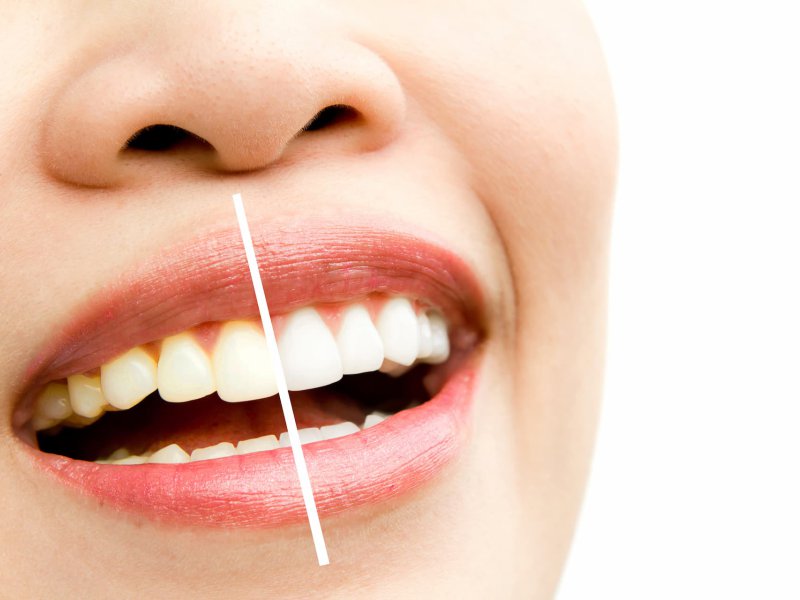
Teeth Whitening (Bleaching): Methods, Candidacy, and Aftercare
Teeth can change color over time for many reasons. Foods, staining beverages like tea and coffee, smoking, aging, and certain medications can cause permanent discoloration of the enamel. Teeth whitening (bleaching) is an aesthetic treatment that removes these stains and lightens the shade beyond the tooth’s natural color.
From a dental perspective, whitening relies on peroxide-based agents that release oxygen to break down pigments within the dentin and enamel. Depending on the approach, it can be performed in a clinical setting (in-office whitening) or at home (take-home whitening) under professional supervision. In both methods, the goal is to achieve an aesthetic result without damaging tooth structure.
Common questions such as “Is whitening harmful?” or “Is the effect permanent?” should be answered clearly and scientifically. When performed with the appropriate method under a dentist’s supervision, whitening does not harm teeth and its effects can be maintained for a long time.
This article details whitening methods, who they’re suitable for, and what to watch for after treatment.
What Is Teeth Whitening?
Teeth whitening (bleaching) is a cosmetic procedure that aims to lighten tooth color by oxidizing pigment molecules accumulated in the enamel or dentin. Over time, factors such as coffee, tea, tobacco products, certain foods, or aging can cause stains on and beneath the tooth surface.
These stains may result in a color darker or more yellow than the natural shade. Whitening neutralizes these discolorations with chemical agents—most commonly gels containing hydrogen peroxide or carbamide peroxide—giving the tooth a lighter and more aesthetic appearance.
Whitening can be applied to vital (living) teeth, and—with a special technique called internal bleaching—to individual non-vital (root-canal-treated) teeth that have darkened from within.
Key point: Whitening should be performed in a controlled manner and under the supervision of a qualified dentist so as not to damage enamel. Otherwise, risks such as excessive sensitivity, gum irritation, or uneven results may occur.
What Are the Teeth Whitening Methods?
Teeth whitening can be performed in several ways. The choice depends on factors such as the person’s baseline shade, type of stain, vitality of the tooth, and sensitivity. Main methods include:
In-office whitening (clinical whitening): Performed in the dental office with higher-concentration bleaching agents and produces rapid results.
Laser/light-activated whitening: Uses light or laser energy to accelerate activation of the whitening gel.
Take-home whitening: Custom trays made under a dentist’s supervision are filled with lower-concentration gel and worn at home for specified periods.
Combined whitening (office + home): Starts with an in-office jumpstart and is maintained or enhanced with take-home sessions.
Single-tooth whitening (Internal Bleaching): For a root-canal-treated tooth that has darkened internally; the bleaching agent is placed inside the tooth to correct the discoloration from within.
Each method has advantages and disadvantages; professional evaluation is essential.
In-Office Whitening
In-office whitening is performed by a dentist using high-concentration bleaching agents (e.g., hydrogen peroxide). It can lighten teeth by several shades in a short period (often a single visit).
General steps:
Protect gums and soft tissues (e.g., rubber dam or protective gels)
Apply whitening gel to the tooth surfaces
When indicated, activate with light, laser, or LED
Reapply and reassess across cycles; repeat as needed
Advantages
Fast results: Noticeable whitening within hours
Control: Direct professional supervision for better management of side effects
Disadvantages
Sensitivity: Temporary post-treatment sensitivity may occur
Cost: Typically more expensive than home methods
Some stains (e.g., tetracycline-related gray discoloration) may be harder to fully correct
Laser/Light-Activated Whitening
This method supplements conventional in-office whitening with laser or light energy to accelerate the gel’s chemical reaction and speed oxidation of pigments.
Procedure overview:
Apply whitening gel to tooth surfaces
Expose to laser or LED light for specified intervals
Light energy activates the gel and speeds pigment breakdown
Advantages
Noticeable whitening in a short time
Fewer sessions may be needed
Potentially more effective under close professional control
Disadvantages & Limitations
Sensitivity can be more pronounced
Higher cost
Not suitable for all stain types; deep or intrinsic stains may respond less
Take-Home Whitening
Take-home (tray) whitening uses custom transparent trays prepared by the dentist. The patient places low-to-medium concentration gel in the trays and wears them at home as directed.
Process:
Impressions are taken and custom trays fabricated
Dentist provides instructions on gel placement, wear time, and frequency
Patient wears trays—often at night or for set daily intervals
Treatment can last several days to a few weeks
Advantages
Comfortable home use
Less costly than in-office methods
Often associated with lower sensitivity
Disadvantages
Results appear more gradually
Inconsistent use may limit outcomes
Success depends on patient compliance
Ideal for mild-to-moderate staining and for maintaining or enhancing in-office results.
Combined Whitening
Combines in-office and take-home approaches to leverage the benefits of both. A rapid change is achieved first in the clinic, then sustained with home applications.
Advantages
Fast initial improvement + ongoing at-home maintenance for longer-lasting results
Deeper stains can be addressed in-office, while trays help stabilize shade
Side effects (e.g., sensitivity) can be more carefully managed
Disadvantages
Total cost reflects both office and home components
Requires coordinated planning (tray dosage, session frequency, etc.)
Widely used in moderate-to-severe staining to maximize efficacy and durability.
Single-Tooth Whitening (Internal Bleaching)
Also called internal bleaching, this is primarily used when a root-canal-treated tooth has darkened from the inside; surface whitening alone may be insufficient.
General steps:
Ensure root canal treatment is satisfactory
Carefully clean the pulp chamber/dentin
Place bleaching agent inside the tooth; seal temporarily
Leave in place for several days/sessions and reassess
Repeat if necessary
Final step: seal internally and place a definitive restoration
Advantages
Targets the single darkened tooth
Allows shade matching to adjacent teeth
Minimally invasive
Disadvantages
Applicable only to non-vital teeth
May require multiple sessions
Requires meticulous technique due to internal placement
An effective solution for darkening after endodontic therapy.
How Is Whitening Performed?
The exact technique varies by method, but the core principle is the same: an oxidizing agent breaks down pigments within enamel and dentin to lighten tooth color.
Typical in-office workflow:
Exam & planning: Assess oral hygiene, shade, enamel condition, and any sensitivity.
Isolation/protection: Shield gums and soft tissues with barrier gel or dam.
Gel application: Apply whitening gel—often 15–40% hydrogen peroxide.
Activation: Optionally activate with light/LED/laser.
Timing & removal: After the indicated time, remove gel and evaluate. Repeat once or twice if needed.
For take-home whitening, the dentist prepares custom trays, provides a lower-concentration gel, and instructs the patient on wear times and frequency.
Pre-treatment tartar removal, caries control, and desensitizing measures can improve success.
Post-Whitening Care: What to Watch For
Right after whitening, the tooth surface is temporarily more permeable. Choices made during this period affect both longevity of the result and tooth health.
The first 48 hours are considered an “open staining window.” During this time:
Avoid highly pigmented foods/drinks: Tea, coffee, red wine, cherry juice, beetroot, curry, etc.
Avoid smoking and tobacco: Nicotine can cause rapid restaining.
Avoid extreme temperatures: Very hot or cold foods/drinks can worsen sensitivity.
Skip colored toothpastes or mouthwashes: Especially blue/green products that may deposit pigments on freshly whitened enamel.
Prefer fluoridated, sensitivity-relief toothpaste.
Additionally:
Maintain hygiene with floss and gentle brushing in the first days.
Avoid oral trauma and aggressive brushing habits.
Keep scheduled follow-ups; this helps prolong the whitening effect. In some cases, touch-up sessions at 6–12 months may be recommended.